Node Pools are now available in Leaseweb Managed Kubernetes. This highly anticipated feature brings flexible, multi-tiered infrastructure management to your clusters, complete with native label support that makes workload orchestration more powerful than ever.
What Are Node Pools?
Node Pools allow you to create and manage groups of nodes within a single Kubernetes cluster, each with its own configuration, instance type, and scaling behavior. Instead of running a homogeneous cluster where all nodes are identical, you can now create sophisticated infrastructure that matches the needs of diverse workloads from a single Kubernetes cluster.
Think of node pools as specialized teams within your cluster, each built for a specific job. You can have one group for staging, another for web services, and a third for your database.
You can add custom labels to your node pools directly through the creation interface; no post-configuration kubectl commands required.
Why Labels Matter
Labels are the foundation of intelligent workload placement in Kubernetes. With labeled node pools, you can:
- Route workloads precisely using nodeSelectors and node affinity rules
- Separate environments (production, staging, development) within a single cluster
- Implement cost allocation by tagging resources with team, project, or cost center labels
- Optimize resource usage by directing specific workload types to appropriately sized nodes
The label field accepts standard Kubernetes key:value format (for example, environment:production), ensuring seamless integration with your existing deployment workflows and GitOps practices.
Creating Your First Node Pool
We’ve spent significant time crafting an interface that makes node pool creation straightforward and transparent. The new configuration wizard guides you through a four-step process with clear visual progress indicators, so you always know where you are and what’s next.
Step-by-Step Configuration
The wizard breaks cluster creation into logical stages:
- Kubernetes Version – Choose your K8s version with clear recommendations
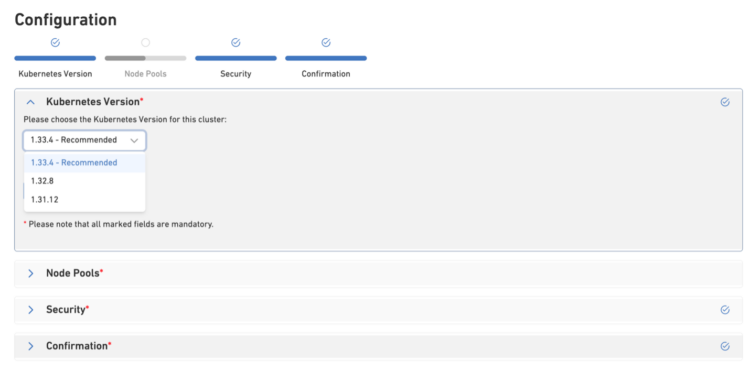
- Node Pools – Create and configure your pools
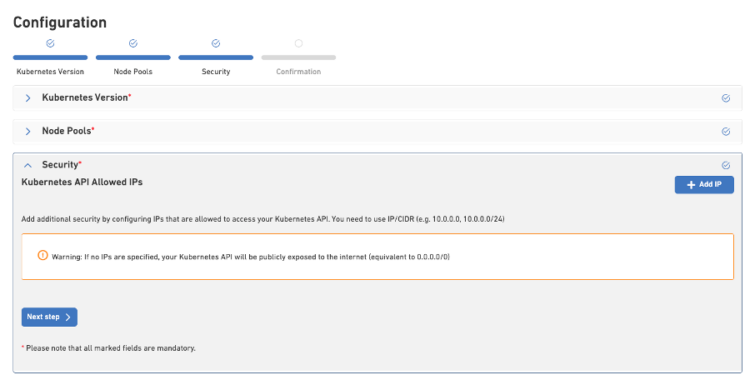
- Security – Set up access rules to the cluster
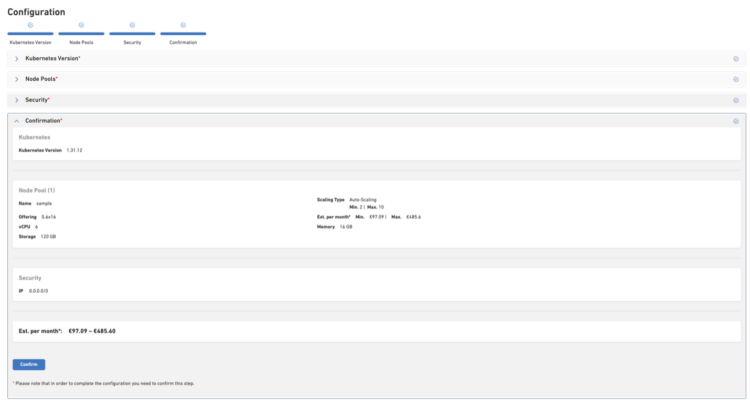
- Confirmation – Review everything before deployment
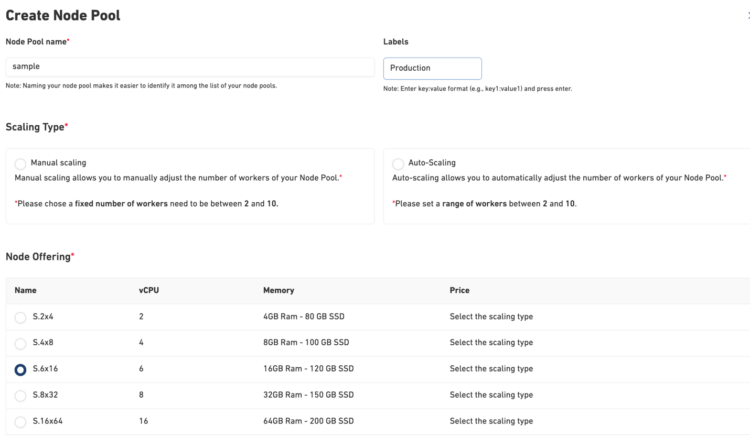
1. Pool Identity
Give your node pool a meaningful name that makes it easy to identify among your cluster resources. Good naming helps teams understand infrastructure at a glance; names like production-high-memory or batch-processing tell the story immediately.
2. Custom Labels
Add labels that describe the purpose and characteristics of your node pool:
workload-type: web-services
team: platform
cost-center: engineering
These labels become node labels automatically, enabling sophisticated pod scheduling without any additional configuration.
3. Scaling Strategy
Choose between two scaling approaches:
- Manual Scaling provides complete control with a fixed number of workers (2–10 nodes). Perfect when you have predictable workloads and want consistent performance.
- Auto-Scaling dynamically adjusts your node count based on demand. Set a minimum and maximum (2–10 nodes), and the cluster scales automatically as your workload grows or shrinks. Ideal for variable workloads and cost optimization.
4. Instance Type Selection
Select from multiple compute offerings tailored to different workload patterns:
| Instance | vCPU | Memory | Storage | Best For |
|---|---|---|---|---|
| S.2×4 | 2 | 4 GB | 80 GB SSD | Development, testing, lightweight services |
| S.4×8 | 4 | 8 GB | 100 GB SSD | Small production applications |
| S.6×16 | 6 | 16 GB | 120 GB SSD | Standard production workloads |
| S.8×32 | 8 | 32 GB | 150 GB SSD | Memory-intensive applications, caching layers |
| S.16×64 | 16 | 64 GB | 200 GB SSD | High-performance computing, large databases |
Real-World Use Cases
Multi-Environment Architecture
Run production and staging in a single cluster with clear isolation:
name: production-pool
labels: environment:production, tier:critical
scaling: auto-scaling (3-10)
instance: S.6×16
name: staging-pool
labels: environment:staging, tier:non-critical
scaling: manual (2)
instance: S.4×8
Deploy your applications with node selectors:
kind: Deployment
metadata:
name: api-server
spec:
template:
spec:
nodeSelector:
environment: production
Cost Optimization Strategy
name: batch-workers
labels: workload-type:batch, cost-priority:optimized
scaling: auto-scaling (0-10)
instance: S.4×8
Use pod priority classes and cluster autoscaler to ensure batch jobs only spin up nodes when needed, then release them when work is complete.
Pricing Transparency
- S.6×16 pool (2–10 nodes): €97.09 – €485.60 / month
- S.4×8 pool (1–5 nodes): €48.55 – €242.75 / month
You pay only for the nodes currently running, with no management overhead or hidden fees. Auto-scaling ensures you’re not paying for idle capacity during low-traffic periods.
Best Practices
Use Auto-Scaling Wisely
Set realistic minimums to maintain cluster responsiveness while allowing maximums that accommodate growth. A 3–10 range often works well for production pools. Need more than 10 worker nodes? Raise a request and we can support beyond that.
Combine with Pod Disruption Budgets
When running critical services on auto-scaling pools, use Pod Disruption Budgets (PDBs) to ensure graceful scale-down events don’t impact availability.
Get Started Today
Node pools with native label support are available now for all managed Kubernetes clusters. Whether you’re architecting a new cluster or enhancing an existing one, node pools give you the flexibility to match infrastructure to workload requirements precisely.